Philips Hue vs Philips Wake Up Light

Philips leads many areas of lighting, and I appreciate a business that knows to specialise and do well in their chosen area.

I have been using a Philips 3520 Wake Up Light for over a year now. I find it very gently wakes me up, especially in winter, and suits my rhythms well. I hate sudden loud alarm clocks and this solves that problem well.

I recently bought a clever Philips Hue kit to play with and compare.

Both are high efficiency LED based units with some clever tricks. This should give you some comparison information.

Philips3520 vs Hue


Feature Wake Up  Hue 
Power Outage Behaviour Forgets Time – No Battery Backup Turns on Full Brightness.

It is VERY annoying to have lights turn on in the middle of the night after a power outage leaving you fumbling for your phone to turn them off.

Does not forget time or schedule with power interruptions.

Gentle Wake Up 40 Minutes, very gentle and pleasant. 9 Minutes with harsh sudden start at about 30% brightness
Colours Fixed Huge variety
Programming None All sorts of clever options, especially with IFTTT
Style Light comes from 80% from front of unit. Use any fitting you like
Alarm (Sound) Function I never use it None
Reading Light Very good.

Small fiddly buttons.

Unfortunately easy to disable alarm by accident.

Very Good. You need your phone handy.
Power 24V DC 220V AC
Comments Light from the rear of the unit bounced off the wall would be much more gentle on the eyes.

It really needs a battery backup. I have actually hacked a 24V battery into mine to be sure it works no matter what.

Powering on to full brightness after a short power outage at 2AM is very unpleasant.

The harsh startup is also a bit rough. I’m sure both of these could be fixed in software.

If Philips merges these two products, they could be onto a really good thing. Some usability bugs could be readily improved.

Oh – and a good battery backup.


Dorcy LED Torch

Cheapest LED Bulb

Here’s a great hack. KMart is selling these torches for about $3.50 with batteries. The LED in this is fitted to a normal sized bulb fitting, meaning it can be taken out and put directly into any 2 Cell torch, AA, C or D.

P4090002

http://www.dorcy.com/products.aspx?p=412503

It’s a very bright 10mm LED in a normal bulb fitting. No regulator circuitry.

This has to be the cheapest source of LED drop in bulbs for torches I have found. Or you could just use the torch.

The beam is much brighter than a normal 2 cell torch. Runtime would be significant, although I haven’t done a full runtime test. You’ll use far less batteries, better for the environment.

Beam pattern is an average spread.

Greenpower – what exactly am I paying for?

It may appear obvious what you receive for your Greenpower dollar, but I quickly found it wasn’t. I buy Greenpower and recommend it, but I now have a much better understanding of what I am getting for my money.

I buy my Greenpower from Origin Energy as 100% Wind in Queensland Australia. I do this so that the electricity I use comes from a renewable carbon neutral source. The thought that occurs to me is to ask where this “green” power is sourced from and  how that relates to the photovoltaic (PV) panels on my roof.

The answer it turns out is a little confusing, but consistent.

Power producers generate power and sell that power to the grid retailers at electricity market prices. It doesn’t matter about the source, the market price is the same. If you have a home PV system, you are just a power producer, and get to sell into the grid at some agreed rate.

Registered GreenPower producers also get to sell REC’s into the REC market. These REC’s represent every MW-Hr of power they sell. When you pay extra for Greenpower, you are buying these RECS. This link means that for every KW-Hr you buy, a KW-Hr of GreenPower is generated by a registered generator. The requirements for registered generators are fairly strict to ensure they are carbon neutral sources.

Under the Greenpower Program Rules REC’s can be obtained from a number of sources. These are large registered generators, and also from pooled REC’s from home PV systems that are grid connected. If you sell (wreck) your REC’s, then they may be included in the Greenpower scheme.

Home PV systems are treated a little differently to large scale generators, where the REC’s are issued for the "deemed" life of the system (15 year deeming period), rather than created yearly. This means that the Greenpower you are buying now may not be generated yet – obviously not ideal, but these systems make up less than 5% of the total REC’s sourced, so it’s not a critical issue.

Solar Hot Water system REC’s are not eligible to be used in the Greenpower scheme, so you are actually paying for real power produced, not power saved.

The electricity your home PV system exports out to the grid is just electricity. It’s not classed as Greenpower, despite the premium you are paid for it. (The premium is paid by Energex, with Origin only paying $0.07 of the $0.50 paid). The Greenpower relates to any REC’s you sell for the deemed life of the system, not to the actual amount of power going out the meter in that period.

If you sell your REC’s, this means that you have sold all the carbon savings from your system to someone else. Any power you use from the system on your roof is no longer “green” (yes – that’s a little confusing). When you pay for Greenpower, you are buying some of the REC’s back. If anything, this is where the “hole” in the scheme lies. When you buy Greenpower (REC’s) from most generators, every one of the units is exported to the grid. If the REC’s you are buying are sourced from home PV systems, then that power may never actually be exported onto the grid. I think it’s a flaw, but it’s a small enough percentage to not bother me too much.

How all this fits into the MRET (Mandatory Renewable Energy Target) and the Australian Governments new Solar Credits Scheme is yet to be legislated.

Simple hey, clear as mud. No wonder people get confused with this stuff. It is a consistent system though, and does ensure that when I leave the lights on, it’s coming from a carbon neutral source and audited to prove it.

What I pay for Electricity with Origin

Power 100% Wind Buy Green Total
15.455 4.999 20.455

What Origin pays me for Electricity

Sell State Govt Sell Total
6.1 44.0 50.1

I was given some more info by the guys at www.localpower.net.au about why Energex who runs the grid benefits from the distributed power solution.

Power Costs
43% energy (generation) cost
47% network (grid) cost
10% retail cost

http://www.qca.org.au/files/ER-NEP910-QCA-DraftDecBRCI-Report-1208.PDF

Combining Vista Media Centre & a Virtual Windows Home Server

The time came to decommission the Home Server once I realised how much power it was pulling. My power meter debacle had concealed the 24/7 150w consumption, chewing into my solar feed in tariff at 44c in the daytime and my green power rate at 21c at night. This was costing me about $400/yr in power bills – it had to go.

I have toyed with various options, but the most obvious was using the other machine that was on 24/7 – the Vista Media Centre.

I found some info on running Windows Home Server as a virtual guest, but nothing on the impacts to the Vista Media Centre host. My host was not particularly new, a 3yo PC with the following specs:

  • MB – Asus N4L-VM-DH
  • CPU – Core 2 Duo T2400 1.8Ghz
  • RAM – 2GB Kingston
  • HDD 7200RPM 500GB WD
  • Silent Heat Pipe Video Card
  • Antec Truepower2 Power Supply (pre 80+ standards)
  • 100MBit Ethernet to router

I figured it would be a stretch for this machine to run a VM as well, but it was worth the try. It is a fairly power efficient machine, the Core 2 Duo being a laptop CPU and noted for it’s efficiency. The current video card pumps out heat 24/7 and could do with improvement, I’m waiting for the new Intel Nehalem CPU range to arrive and come down in price, by which stage on board video should be suitable – more power savings.

I grabbed a couple of 1TB WD Green drive, as my experience with them inside WD MyBooks showed them to be very quiet and efficient.

I used VMWare Workstation 6.5 as I had it, but you could use VMWare Server – it’s free. You could also use Windows Virtual Server, but I felt (possibly incorrectly)  VMWare may have slightly lower overhead and better direct hardware and USB support. Virtual PC / Server have no USB support last I checked.

The Asus MB has 3 x SATA ports, and a PATA port. Two of the SATA ports were already in use with the DVDROM and host HDD, so I ran the first HDD on the spare SATA socket expecting great results. It was awful, woefully slow, rendering the machine unable to even record TV shows. Turns out he extra SATA slot is for RAID, and due to firmware / drivers, IRQ’s went through the roof consuming 60% CPU time. A two channel PCI SATA card fixed this problem.

With that nailed down, I installed Windows Home Server w/ PP1 onto an 80GB Virtual Disk on the 1TB HDD. The host OS and TV recording was all onto the original 500GB HDD.

Virtual machine config was easy. , Setup a Virtual Machine as Server 2003 w/ 512MB RAM, an 80 GB IDE Virtual HDD and mount the Home Server CD ISO. Sound and other unnecessary things were removed.  I elected not to fully allocate the 80GB HDD, although this may impact my performance later.

Home server will install on the above with no major configuration steps. All drivers are fine. Once the install is finished, install the VMWare tools, run Windows Update, and activate your Home Server. There are instructions here – but they use a virtual SCSI HDD, greatly complicating the install for no benefit I can discern. I would use a virtual IDE.

Once mine was installed I added the extra disks. Initially I tried the disks as Direct Physical access. They were setup with a partition, but no drive letter, as per the vmware help. The VM would not even boot and there was a disk access conflict. Nothing I did could resolve this problem, so I had to settle for a couple of 900GB virtual disks (not pre-allocated) on the 2 x 1TB HDD’s (930GB formatted capacity NTFS). I tried VMWare Server 2.0, but it doesn’t support direct physical disks anymore, and also broke my Remote Desktop to the host. VMWare Server 1.08 wasn’t compatible with my VM, so I gave up.

The benefit to using Physical Disks is threefold:

  • The entire disk is allocated to Home Server, maximising space
  • The disks can be unplugged and read anywhere
  • There is no possible conflict with access to the disk.

Unfortunately it was not to be – so virtual disks it is.

image_thumb8

The initial problem I had was WOEFUL disk performance and 100% CPU usage. Task Manager showed the “System Idle Process” to be hogging the CPU. Process Monitor showed it to be 60% used by IRQ’s. Google tracked that to the HDD not being in DMA mode, but rather PIO Mode 4 due to firmware / drivers / phase of the moon. As I couldn’t fix it easily, I bought and installed a 2 port PCI – SATA card. The CPU load is normal using this card as opposed to the on board port.I have since tried storing the VM 80GB “OS” drive on both the 1TB WD 5400RPM VM dedicated disk, and the faster 7200RPM disk shared with the media centre, and couldn’t detect a difference in performance either way. I have left it on the VM disk to optimise space for TV recordings.

Next issue was awful network performance between the Host and Guest. Guest to other network computers was fine – about 4-8MB/s, but Guest – Host was shocking – about 20Kb/s. Like all good technicians today I didn’t use my brain, but hit Google again. TCP Offload seemed to be a recurring theme here. The registry keys for XP didn’t fix it, but the advanced settings for the network adapter did. TCP Offload disabled on the host and now I get the same network performance anywhere. This is not a fault with VMWare, but does seem to be a common compatibility issue with many network adapters, my onboard nic being one of them.

image1_thumbimage_thumb1

The final hurdle was again performance related. The guest Home Server would be running, but very sluggish to respond to inputs if you had left it alone for a while. It’s like VMWare let it go to sleep, and took between 1-4 minutes to assign it resources again. I made two changes here. I disabled Memory Page Trimming in the VM admin interface and disabled Page File Sharing with the line sched.mem.pshare.enable=”FALSE” in the .vmx config file.
Both of these seemed to keep the Home Server in a much more responsive state when I wanted it. It still often needs two clicks to “connect” to the console – the first fails, but network shares and backup work perfectly. As the console is not something I regularly access, I’ll ignore this issue.

There are some other tricks that can help. I did the following on the host to reduce any possible performance hits:

  • I don’t run Anti-Virus on my Media Centre, so exclusions for that weren’t necessary. If you run AV it’s recommended to exclude the VM files to reduce overhead.
  • Snapshots on the HDD used by VMWare were disabled – won’t be needing them for backup.
  • Recycle Bin disabled – don’t need that either.
  • Added a shortcut to the VM to the startup folder so it auto-starts. (VMware took away this nice feature from VMWare workstation)

With the Home Server running and all updates installed (particularly PP1) it was time to install the connector to all the PC’s in the house, and configure backups. This is mostly straightforward. There is one trick – you MUST exclude the Virtual Machine folders from the backup when you install the connector on the Vista Media Centre Host. Otherwise it will try backing up itself to itself, decide it won’t fit, and have a heart attack.

Once everything was installed I copied over all the data using Robocopy. I found that the Windows Copy with that much data to the VM wasn’t particularly reliable, although that may have been due to not having all the above tuning done first. My sequence was a learning exercise.

Vista Media Centre has an option to add remote data to it’s library. I have added music, pictures, MPG4/DivX and DVD’s stored on the Home Server. You’ll need to use the DVD library reg hack to get the latter to work.

I haven’t tried using the Home Server to store recordings of live TV, but watching movies stored on it with either DivX or a ripped DVD works just fine. Network performance is as above.

I have also setup a 1TB Mybook using USB to be the backup drive. The USB seems to work fine and is setup to automatically connect. Backups to the external drive are the usual manual deal.

Now I have access to all my data, a large file store, regular backups, a quiet media centre and a single box that only chew’s 85w. Performance is acceptable, but not amazingly snappy. I think it’s an acceptable compromise. It doesn’t really take any longer than when the old server had to spin up it’s six HDD’s. I’m not sure if the HDD’s are spinning down under VMWare, there is a few more watts to save.

I’m looking into power saving inside VMWare next, but think I’m off to a pretty good start.

There are a few things I would like to do to improve the solution:

  • Get it going on VMWare Server (and not break RDP / Remote Desktop)
  • Resolve the physical disk access issue, I assume it’s to do with running under Vista, but have no evidence to back this up. I tried disabling everything that might conflict.
  • The performance is still not snappy on the console. The host CPU, RAM and Disk are not busy, so what’s making it sluggish. Network transfers and backup are fine, it’s just the console that’s sluggish.
  • How does WMWare interact with host power saving features?

Update Oct ’09
Now running VMWare Server.
No real difference. Still can’t use native disks.
I’ll go back to pyhsical once the new Pinetrail atom is out. Although it works, I’m sick of the ultra-long boot times.
I’l make the new WHS an Atom and the VM Host media centre an i3 w/ integrated Video.

WD External USB HDD’s do Spin Down

I’ve been trying to reduce the power of my Home Server and Media Centre. Since my Power Meter debacle, I am now re-testing all the equipment and getting some rude shocks.

One of the positives out of this is that my 1TB Western Digital  My Book Essential and 300GB Western Digital My Passport Essential both spin down and save power. On USB, this is a nice feature, as many of the generic external cages don’t spin the drive down.

The WD’s spin down on XP, Vista and Windows Home Server which is based on Server 2003. The timeout appears to be independent of the OS settings.

They support several power modes, and my current meter is not accurate enough to report which one they are in.

The WD 3/5″ Black is the 7200RPM desktop drive.
The WD 3.5″ Green is the 5400RPM drive generally in the MyBook
The WD 2.5″ Blue is the 5400RPM drive generally in the MyPassport

Model C’pcty Operate Idle Stdby Sleep
WD 3.5” Black 1TB 8.4 7.8 1 1
WD 3.5” Green 1TB 5.4 2.8 0.4 0.4
WD 2.5” Blue 500GB 2.5 0.85 0.25 0.1

The other thing I noted was that my new power meter (which is not rated as accurate below 10w) indicated that whilst sleeping, the 3.5″ and it’s power adapter were drawing less than 1w. The power adapter was only just warm, much better than the usual little heat wasters. Well done WD for killing the parasitic standby power.

Overall, they get my vote as low power green storage.

The Green 3.5″ and Blue 2.5″ drives are also very quiet – both operating and seek. The 2.5″ is quieter, but with half the capacity, may not stack up overall.

And you can always decode the Morse Code on the outside!

Lies, Damn Lies and Cheap Power Meters

PA050027I have had and used an Electus power meter for about 12mths since they became available in Australia. I figured it was just like the American Kill-a-watt. Diligently collecting and comparing devices to see what they used and how much I was wasting with standby power. Dan did an early review on DansData.

ATA reported some accuracy concerns early on, and stopped selling them. The indication was this was only minor, and at low power settings.

I recently purchased the newer Solarinverters (SI) replacement from ATA and found some VERY large discrepancies between what I had seen before. Unsure as to which one to trust, I fired up the clamp meter to validate the results. The results shocked me.

I then confirmed the results against two other Electus meters of the same model.

The Electus meters are TOTAL AND UTTER JUNK. The numbers that come out have NOTHING to do with reality. The behaviour does not even appear to be linearly consistent.

Device Electus SI PF (SI) Fluke

Ent System

143w

317w

0.80

1.6

Washing Machine

17w

3w

0.16

n/a

PC & Acc

85w

199w

0.71

1.1A

Kettle

2550w

2340w

1.00

9.8A

11W CF Bulb

9W

14W

0.68

n/a

Water Pump 449w 472w 0.95 2.0A

Disappointingly Jaycar is still selling them.

The below pictured numbers are all with the SAME LOAD – a computer, UPS, Router, Printer etc. All numbers were repeated three times and fluctuations were minimal at this time.

PA050021
Fluke meter validation Rig

PA050023
1.1 Amps on Clamp Meter

PA050024
0.37A on Electus Meter – kinda disagrees with the 1.1 on the clamp meter. This is where the majority of the error seems to lie.

PA050026
1.16A on SI Meter

PA050027
The voltages read the same

PA050025
85W – 0.92 PF from Electus – again, the electus can’t seem to cope with PF giving readings that are often clearly incorrect. This will significantly affect the wattage calculation.

PA050028
0.71 PF from SI – this is about what I would expect.

PA050030
199W from SI

PA050029 
278VA from SI – matches the Fluke

PA050032
Units from rear

PA050033
Units from front

Now my clamp meter hasn’t been calibrated, but it is a Fluke. It’s only got one decimal place of precision. Using my other Fluke as an inline ammeter with mains voltages was too risky (exposed terminals) for me, so I didn’t do it, depsite the extra decimal place of precision.
I don’t have an independent Power Factor meter. I could be telling lies, this is the internet. The above numbers aren’t a small % error. They are out by over 100%. This is not a minor calibration issue, this is a device that clearly misleads Australian consumers.

I’ll stick with the new one and redo the testing round my house.

My digital home just isn’t quite there yet

I’ve been trying to have the whole digital home experience for a while now. I’ve reviewed Vista Media Centre, Home Server, Wireless N before, the experiences there are documented.

The impossible dream I am thinking of consists of seamless integration between:

  • Home Server
  • Media Centre
  • Extenders
  • Game Consoles
  • Digital Picture Frames
  • Media Players
  • Wireless
  • Broadband
  • VOIP vs VOIP vs VOIP
  • Desktop PC’s
  • Cloud Services
    • So lets look at the current state of play for these things.

    Home Server

    I reviewed home server here. It’s a great product that acts as a network store for your folders, and backs up all the PC’s in your house. It has a brilliant Disaster Recovery solution and one of the most innovative backup and storage solutions I have seen in a long time.

    Unfortunately that’s all it is, and that means 40watts at idle 24/7 – 88KwHrs / qtr, and more if I make it work hard.

    Media Centre

    This thing‘s purpose in life is to record TV, and play content. In Australia it does an average job of both. It’s another 50watts 24/7.

    Trying to get a PC to work well in a lounge room is an exercise in frustration. Noise, power, keyboards, mice and windows hiccups are just not fun. Add in the TV compatibility problems many experience trying to get TV interfaces and resolutions correctly out of a PC.

    It’s great when it works, but it’s definitely high maintenance.

    As many people have said before me, what about storing the videos on Home Server, and getting it to do the recording too. That way they noisy PC can stay in the back room, and one PC can have an excuse for staying up chewing power 2/47, not two.

    I don’t really stream my video, I watch it off a remote file share. A performance comparison of Streaming vs File Serving is here.

      Extenders

    I can’t claim to have one of these yet. The reviews are average, and every XBox 360 I hear about dies an early death.

    These seem to be the obvious choice for the lounge room. They are quieter, more aesthetically pleasing, have native TV interfaces (PAL, Component etc), and an interface that never needs a mouse to drive it. They also play games, so many people end up wit one anyway.

    The well known issues with power consumption on some of these come up, but at least it’s only when being watched, and it’s probably not more than the plasma TV anyway.

    A chipped XBox with XBox Media Centre was my weapon of choice for years. It’s an aging solution now, and doesn’t have HiDef, but as a media player for over the network content, it beat Vista Media Centre hands down.

    I can see this being the future of the lounge room.

    The current problem being the limited support for what can / cannot be streamed to the current extenders, and how to connect the things.

      Game Consoles

    The Wii seems to excel here, as  a pure games console. The best comparison i reckon is here.

    If you want all the video streaming, it’s XBox 360 or possibly, Playstation 3.

      Digital Picture Frames

    Nice toy, chews power all the time, unlike an old fashioned photos. Be good if they only displayed when they sensed movement.

    The wireless versions I have seen seen only work off Flikr and other web services. None seem to be connecting to a local PC to show photo’s from. Great for using bandwidth.

      Media Players

    Everyone has an iPod, even me. I dont’ use iTunes at all, so it’s solid MP3’s. Unfortunately Apple in their wisdom designed the thing on ID3 tags, not on files / folders. If your tags aren’t perfect, you’ll have all sorts of fun navigating the thing.

    I’m still looking for the cheap simple, web managed, wireless MP3 player I can plugin to my amp.

    An old laptop or Asus eePC is topping the list at the moment.

      Wireless

    I ran wireless G for ages – just plain G, none of the tricky variants as my laptops built in is only basic G. It’s fine for web browsing and acceptable for file copying, but coverage and streaming movies never really worked.

    I recently threw a bucket of cash a a Wireless N solution, sticking to a single vendor to keep the process smoother. Netgear is more common that Linksys in Australia.

    Well the coverage is mildly better, and it is a bit faster, and that’s all. The problem is that the speed is still very variable, so even though the average is OK, for playing movies over the LAN – it all falls down.

    Luckily my house lets me run a cable underneath to the lounge easily, so I have a solution, but it’s a disappointment.

    I will have no such luck with running a cable for the spare room with the kids TV and their (might get for XMAS) 360. The consoles also don’t support Wireless N, so that’s more kit to buy.

    So much for the wireless dream.

    Looks like some others agree with me here and here

      Broadband

      I’m got lucky here, with my house being able to get Naked (Unbundled Local Loop) ADSL2+. I get about 7 Mbit download speeds. Being ULL means I don’t have to pay Telstra any money, and that makes me happy.

      I don’t quite understand why a GB is cheaper on ADSL2+ than the same GB on ADSL, but I won’t complain seeing as I get the service.

      This is one part of the equation that works well for me.

      I do however have to run THREE devices pulling another 40Watts 24/7. A Wireless/Firewall/Router, an ADSL Modem and a VOIP adapter, all pulling their own power, each with their own old fashioned power brick radiating heat.
      Where oh were is the all in one Modem/Router/Wireless N/VOIP adapter that only pulls 5 watts.

      VOIP vs VOIP vs VOIP

      “Skype” vs “VOIP from my ISP” vs “Messenger”

      And never shall any of the above meet. Good luck all ye who enter here.

      Then we move onto Bluetooth headsets, Wireless Handsets, GSM Picocells, and Cordless phones just for laughs.

      Desktop PC’s

      These integrate acceptably into the home network. My biggest hurdles here are

      • What version of Vista
      • Remote Desktop
      • Local User logons
      • Authentication and Passwords for file / printer sharing

      I’m used to domain authentication, and sharing stuff around a home network isn’t quite as simple as I would have thought. More work to be done in this space.

      It is still common to email a file via their internet email address, that is in the same house as you! That tells me point to point file transfer is still way too hard.

      Hmm – maybe device authentication is a better idea in this space than traditional user authentication.

      Wireless Printers

      I have a HP wireless (802.11g) All In One unit. It works well enough except for one critical problem. It gets it’s IP Address via DHCP from the Router. If I don’t set a reservation, this changes sometimes due to the alignment of Venus and Mars. The software fails badly at finding it when it’s IP address changes.

      Tip for Wireless device designers, home IP addresses are very dynamic, plan on your drivers having to work with that.

      A reservation fixes the problem – until the next firmware upgrade.

      Cloud Services

      And finally we have the latest set of toys, the one’s the world’s been saying will happen for years. Well it’s not there yet, even with ADSL2+, but I agree, it’s coming.

      I do like some of the services and I’m using more and more over time.

      • Google Docs is interesting for sharing stuff with my wife.
      • Windows Live Mesh is a new toy – no comment yet
      • Newsgator / FeedDemon
      • GMail w/ Outlook IMAP (testing – it’s a hassle)
      • Domain hosted with Bluehost
      • WordPress for this

      I tried online backup of 20Gb of data, and it does work, but it’s nowhere near as practical as Home Server for me. For small quantities of data it would be very good.

      The whole area is changing, and local sync options are making it more interesting. Google gears enables some of this functionality and is worth looking for.

      Security and privacy are significant concerns. Google can inform you about google here.

      A single authentication solution like OpenID starts to make all of this much easier.

      Summary

      Well the seamless integration of all this stuff is still a long way off. The problems are solvable, but the maintenance is high.

      All I want is devices that chew no power, work together seamlessly, is available anywhere in the world and takes no effort from me. It’s not too much to ask for is it?

      Watch this space.

      Brisbane Translink Go Card Charges in Pounds Sterling

      Sheesh – at the exchange rate – no wonder public transport is expensive! Pounds Sterling – what next – Euro’s?

      image

      image

      This is of course on top of what would have to the  slowest proximity readers on the planet, displays that are impossible to read, an arcane array of “beep” codes, and an “Auto Top Up” function – that doesn’t.

      Great system guys, matches your train network perfectly.

      My Cheapo Greywater Irrigation System

      Like many people concerned with water use and reducing the impact of my excessive capitalist wasteful bourgeois lifestyle I decided to put my greywater to better use. It’s easier than putting my greymatter to better use, and arguably a more valuable resource.

      Water Spike

      I had a few ideas I wanted to stick to, as well as keeping it within reason from council approval. You’ll have to read up on your own council approvals for greywater. I’m basing mine on the “I won’t tell them and they won’t care” legal principle.

      The main principles I wanted were

      1. No storage – stored greywater will build up bacteria and needs space. Althogh up to 24hrs is acceptable, no storage for me.
      2. Shower / Bath / Sink / Laundry only. My kitchen water goes down the normal wastewater system, meaning no grease traps to worry about.
      3. Minimal Maintanance – small holes clog up, it had to be robust. Greywater contains hairs, soaps, grease, dirt and who knows what else that falls off my kids.
      4. Subsurface – I wanted the water delivered under the mulch and into the soil
      5. Cheap, very cheap. That means no pumps or commercial kits.
      These are the trees I wanted to water. Greywater would be perfect irrigation for my 16 tree orchard.
      My sloping block made this much easier, although it would work on a flat block. Uphill – forget it.
          P4190012    
      This nasty looking contraption guarantees things work smoothly. It’s an overflow pipe and diverter valve.
      Details below.
      P4190017
      The diversion valve. When I have too much rain, I turn the valve, and greywater goes back to the council.
      I used 25mm corrugated greywater pipe to get to the trees.
      P4190008
      Overflow pipe – if the greywater can’t escape fast enough  – say when the kids let the water out of the bath whilst I am having a shower – it will fill1.5m of  vertical pipe on the right, then overflow into the kitchen drain pipe on the left. The air-valve is to stop airlock / siphon issues. P4190016
      The first tree also gets a 1.3m overflow pipe. If there is a blockage lower, or too much flow, it simply comes out here. This is below the level of the house. Make sure yours is too. Greywater Overflow Pipe
      1″ (25mm) poly and 1″ poly pipe Y piece.I use the cheapest low density irrigation poly I could get.
      Hose clamps were not needed.
      P4190010
      1″ poly, 1″poly T, and an end stop using a cable tie. P4190013
      The magic ingredient. The 1″ poly fits perfectly into these water spikes. They are $0.99 from Bunnings and designed for use with softdrink bottles. They deliver a perfect amount of water. greywater spike
      A better shot of the holes. I tried enlarging the holes initally – bad move. The factory size is perfect. Larger holes stop downstream spikes getting water. P4190014

      The only thing that has to be done is the spike washed out / replaced every 6 months approx. No filters, no smell, no pumps, no cleaning, no worries. The ends of the pipe don’t appear to collect rubbish, and the system is pretty foolproof and self regulating. It’s all easy parts that should last long term, and be dirt cheap to replace.

      I had the luxury of a high set house and a sloping block, giving me plenty of fall and water flow. Your mileage may vary. It gives me cheap year round irrigation. Long showers are not wasteful – they are a benefit.

      Longer term I would like to find / make a sock filter to go inline with a disposable sock – but I haven’t found one yet.

      T-Amp and Paradigm Atom Review

      I like music in my house and have a mild audiophile fetish, not as bad as some, but enough. I wanted a nice system for the main living room that would be used for background music, the loud stuff being out on the deck, or in the home theatre room. Despite being quiet, it still had to be “nice”.

      It also needed to be small an un-intrusive, and fit on some small bookshelves. This ruled out most amplifiers, as they just don’t come in small sizes.

      For the speakers I settled on a set of Paradigm Atom bookshelf speakers as reviewed here. Steve at Eastwood HiFi was most helpful and I recommend them and his entertaining site.

      I initially considered a Fatman Valve Amp to power it, but with my green bent, the inherent inefficiency of vacuum tubes, and the cost, I looked at other solutions.

      The T-Amp got amazing reviews and some impressive comparisons in it’s various incantations based on the Tripath Chip Class T Amp.

      I picked up a Gen2 T-Amp from eBay.com for US$60 plus postage. The power adapter was full multi-voltage / multi-frequency and worked on Australian power. The unit is TINY, you can see from the pics below how small it is.

      Once powered up, I connected the iPod and started to test. I was initially concerned that the 90db efficiency of the Paradigm speakers wouldn’t be sensitive enough to get reasonable volume from the meager clean 10w/channel and 15w maximum.

      Amazed is an understatement. The volume is more than acceptable, although not ear shatteringly loud, it’s more than loud enough you can’t talk over it. Beautifully clear,  and very simple and clean. The efficiency must be well over 90%, as several hours in, there was no heat from the amp whatsoever.

      This thing gets my vote, beautiful clean power, dirt cheap price, tiny size, and as eco friendly efficient as you can get.

      I’m very impressed.

      P6140011

       P6140013

       P6140014

      Every Light an Energy Saver

      I have recently renovated my Brisbane house and being an eco-geek took the opportunity to make my lighting as energy efficient as I could afford and live with. Here is what I found and some tips if you are looking at the same thing.

      A graduated scale for efficiency is here but this is heavily effected by cycle period and the fixture. You generally need more downlights than open bulbs. Some colours are more or less efficient. Frosted covers impact brightness.

      I have avoided conventional dimmers as although they are very efficient in themselves, they make a halogen or conventional light bulb even more inefficient than normal. 50% brightness still uses 80% power due to the way filament bulbs work. They also don’t work with most fluorescent lighting.

      I mostly stuck with Compact Fluorescent Lamps (CFL’s) and conventional Round Flouros.

      Continue reading Every Light an Energy Saver

      DIY Solar Hot Water

       Vacuum Panel 

      I’m a bit of an eco-geek, and trying to green up my lifestyle. I figured solar hot water was one of the best places to start, and this is the story of the journey so far. I now have a running system that generally works very well and I am happy with. I wasn’t an easy road however and hopefully others can learn from my mistakes.

      There are several rebates available from both the Federal and some State governments (not Queensland). You can also sell the REC’s from certified systems. The Federal Gov rebate is currently for $1000.
      A DIY system will get none of the above.

      My house was fitted with an old instantaneous gas hot water system that had poor flow, awful temperature regulation and chewed too much gas, especially with the pilot light. I initially started considering all the cheapskate systems I could think of, whilst trying to achieve my ideal of solar booted with instantaneous gas when required. I like having lots of hot water and harvest my water from my roof. My council usage is almost nil, so I can waste as much as I like. The grey water from my shower irrigates my fruit trees, so long showers are just fine by me. 

      First idea was black poly pipe, or a DIY panel. The problem with poly is that it can’t handle both pressure and temperature. High temps are fine, high pressure is fine, but not both. Some very thick walled poly would probably cope, but with the weight, fittings and expense this wasn’t particularly practical. Poly also has a large surface area versus it’s collection surface. This means that it loses a lot of heat to the environment, limiting peak temperatures. The advantage of course is that as it’s cheap you can cover a huge are of roof. I know it can be made to work as many swimming pools are heated this way, plenty of farm cottages use the poly as both a heater and a tank, and I know how hot a simple garden hose can get water.

      With poly you can get Low or High pressure rated pipe. Low pressure (low density pipe) is very cheap, and would collect and transfer heat very well due to the thin walls. It would only be able to run on an un-pressurised circuit (more on that later). The problem for me was I wanted my tank to be on the ground, not on the roof. With a two storey house this would result in a vacuum in the pipe from the weight of the water, and the pipe would likely collapse when hot due to it’s very thin walls. 7M (22ft) of head would be about 11PSI vacuum (yeah I know, wrong units, but it’s indicative).

      High pressure poly is more expensive, doesn’t conduct heat as well due to the thick walls, and needs expensive fittings. I worked out the area I would need and it wasn’t particularly cheap.

      The final killer was the lost radiated heat. Reading a number of efficiency articles, mostly relating to cookers, on the Internet, the heat lost without a glass cover was very significant. Vacuum insulation made a huge difference again. Toughened glass is expensive, and whilst I had some toughened glass doors, Brisbane is subject to hail, and I couldn’t see these lasting out that type of impact intact. I’m sure you could make it work, but it was too likely to be problematic for me.

      The other types of DIY panel are simple box batch heaters, and home made copper collectors. The batch heaters are labour intensive to use, and the price of copper precludes making your own panel that way pretty quickly. 

      Then I saw that Australia had invented a more efficient solar hot water panel. Of course being Australia we had done nothing about capitalising on the invention, and now they were made in China. Beautiful, nice and cheap, just what I needed.

      Vacuum Tube Panel

      Vacuum tube panels range in price from $500 to $5000 depending on the source. The Australian brands were all  at the “too expensive” end of the market for me, even though they are probably made in China too. I settled on a 15 x 1.8M tube panel from an importer in Sydney though eBay and had it shipped to Brisbane for $550. This was not entirely successful, and only 5 of the 15 glass tubes made the journey intact. Luckily most Chinese stuff are copies of something else, so they tend to be somewhat interchangeable. I dug around a lot until I found a local supplier with some spare tubes at the right price ($150 for 10)

      I started with one 15 tube panel and a 250L tank. This was based on it being cheap, and I being cheap. I have since found that I use about 150L of hot water / day with my family of four five. A larger tank would be good for being able to last out several rainy days. The single 15 tube panel was adequate, but only just. Plenty of sun and it was fine, but after a few cloudy days the tank would only get just over lukewarm and cool off a bit more by the following morning. I have since found a table that says:

      People Tank 1.8M Tubes
      1-2 150 15
      3-4 250 25
      5-6 350 30
      6+ 400 30+

      On the basis of this I installed an additional 15 tube panel (30 total) and have been very happy with the quantity and temperature of the water. I have not had the 250L tank approach boiling yet with 30 tubes, but regularly see 70C.

      I considered putting the tank on the roof, but my house was built a little agriculturally and I didn’t trust the roof to handle 300kg+ sitting up there. I later regretted this decision and should have braced the roof and sourced a close coupled roof mounted system.

      As the tank was going to be on the ground, I had to fight the natural circulation of the water. Normally the hot water moves up and the cold water down due to the difference in density. I wanted the hot water to come down from the panel and into my tank, and the cold water from the tank to go up. A pump was needed. I looked at the 12v options, and may still go that way yet, many of which use automotive derived parts. I had concerns about automotive pumps coping with residential duty cycles and pressures. Car cooling systems run at 14PSI, not 40-50psi. eBay again to the rescue got me a Hot Water Circulating pump that seemed fair quality and definitely heavy duty – $125. The fittings of course were some weird size, meaning more money later.

      If you run a 12V pump then you can run it from a Solar Panel combined with a pump maximiser to get it started. This makes a lot of sense, as when the sun is shining, you want to be pumping. When the sun is not shining, there is no heat, and you don’t need to be pumping. I planned on putting in a Grid Feed solar system anyway, so figured that the solar power issue was near zero for me personally, and I wanted the heavier duty pump. To run the 240v pump however you need a controller. You can build one yourself, but I cheated and bought a Chinese solar pump controller for $150. It had the advantage of also controlling the heater based on a combination of time and temperature. The power rating of the controller was sufficient to run the pump,but to avoid overload the 3.6KW booster element needed a secondary relay which I paid $23 for.

      The tank came from the local newspaper – $125 for a 250L Rheem that was 4 years old. The guy I think had been smarter than me, collected the Government rebates and had a system professionally installed. It cost him a few more dollars than I was planning on spending, but he had I believe far less headaches. The tank was labelled “Solar Convertible”, but I think Rheem may be deluding themselves here. I have since seen other tanks that would be far easier to convert. Look for additional ports near the top and bottom of the tank, it will make life much easier. The tank was an enamelled steel pressure cylinder.

      Now roughly speaking, in Australia tanks come in two varieties. Pressurised and Heat Exchange. In most tanks, the water in the tank is the water that comes out of your shower. They are very simple with a pipe leading into the bottom of the tank, and a pipe leading. out. There is a heater in the bottom with a thermostat attached, and a safety relief valve somewhere that will open if the pressure or temperature gets too high. These tanks stratify well, keeping cold water near the bottom and hot near the top. You’ll know very suddenly when all the host water is used up. The heating element and / or the solar pumping also breaks up the stratification, meaning your tank may indicate cooler whilst it heats, as it mixes.  Expect big differences in temperature between top and bottom.

      The other variety is commonly a Sachs – the Saxon Copperflow. In this system the tank is better thought of as a bucket of hot water that is not under pressure. There is a coil of copper pipe that leads in and out that is connected to your cold and hot water system. There are several differences with this type of system. The water in the tank must be topped up occasionally from the valve on the side. They are supposed to work automatically but don’t seem to particularly well. As the tank is not pressurised, you can circulate the water through low pressure solar heatiing pipes without them bursting, an interesting idea. The circulating pump is also not running with a pressurised circuit, making it a much simpler device. The un-pressurised copper tank is supposed to have a much longer life than a pressurised enamelled steel tank. These systems don’t statify, so tend to cool down gradually as you use them up. Temperature measurements are easier on these tanks.

      Finally, hot water systems are supposed to heat up to above 60C every 24hrs to stop nasty things growing in them. A tank that keeps the heat reservoir seperate from the water that goes through your taps would be less subject to bacterial issues, especially in the event of it not heating to full temperature.

      Last but not least was the plumbing. This is the bit that hurt the most. I managed to get it all at trade price through mate from Reece plumbing, but there was still $500 worth of pipe, insulation and fittings. Keep in mind that the more fittings you need, the more expensive it will be. In many houses today they are running PEX (Cross Linked Polyethylene) pipe, a grey plastic pipe that is rated for mains pressure hot water up to 90c. It’s cheaper than copper, and far easier to fit, all the connections are push on or crimp on. On a split solar system you need to connect the tank to the panels, and you MUST use copper pipe for this. The water in this circuit will exceed well over 100C and will cause plastic pipe failures. I believe my panels have hit over 160c when the circulating pump stops. More on that later.

      The fitup is pictured below.

      Solar controller and relay in a weatherproof box. I had to put a sunshield on the box as it was getting to hot with direct sun. P3090016
      The display / control panel for the controller is supposed to go inside the house. My block walls make routing the plug too difficult, so it lives in a $10 waterproof letterbox. P3090019
      One of the sensors for the solar controller. They work very poorly. Although accurate when tested, they don’t get a good pickup from the tank so give a false lower reading. I have tried thermal paste etc. Newer models screw into the tank water fittings, a much better idea. I’m going to try and convert mine.
      The sensors are thermistors, not thermocouples.
      P3090021
      The collector panels have a port where you can insert the panel sensor. It’s in a copper tube and gets a good reading. The long run of wire to the roof, despite being heavy gauge upsets the calibration somewhat.
      I silver taped all the insulation to protect it from the sun, but the tape isn’t lasting. I’ll find some better tape one day.
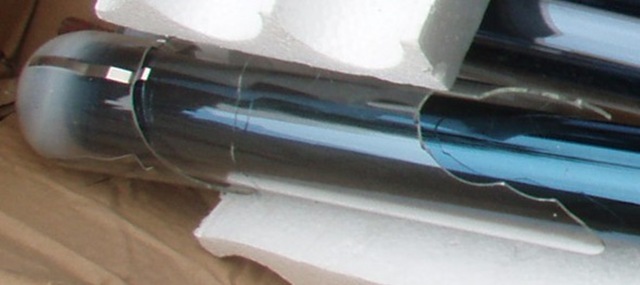
      You can see the distortion from soldering the copper. It’s a long story explained below.
      P3090027
      My first panel 1/2 installed. I hooked up all the plumbing first as I didn’t want it overheating. They are supposed to be ok run dry but I was cautious. Water pipes were not taped at this stage.My roof faces north at about 27 degrees. PA190067
      The ten replacement tubes were slightly longer. I had to improvise their mounts somewhat.Thank you to Rod at SolarOz for helping me here. PA190069
      First panel fully installed – 15 tubes at 1.8m long. PA190070
      I decided I wasn’t getting enough hot water and bought another panel from another guy. $550 for a 15 tube model. P3090022
      The new panel didn’t have “feet” making screwing it down a bugger. I should have made some up but was in a hurry. Make sure yours come with feet. P3090023
      Not sure if I trust this plastic clip to last 10-15 years. P3090025
      250L Tank + plumbing. Controller not fitted in this pic.
      I ran the circulating pipes in insulation then in PVC pipe to conceal and protect the insulation from the sun. Use talcum power to make it easier to thread it through.
      PA210001
      The roof penetration. This is Sikaflex, not silicon, so it will last. Ideally I should use a Decktite but the roof is only shallow pitch and I wanted minimal interference for drainage. The penetration is through the eave so a leak is not significant.
      You can see the sensor wires coming up as well.
      50mm PCV is Internal Diameter. Drill the hole to 58mm external.
      PA190068
      The eBay pump. It has 3 settings with different power and flow rates. Low is fine for both running and priming the loop. The first one had a fault that gave me some stress. It was replaced under warranty.
      It has no mounts so I had to fabricate some.
      These pumps are designed for this and similar jobs, so should last a long time. They are very heavy and heat tolerant.
      PA210002
      This is my home made 5 way adapter. Simple in theory, not so simple in practice.
      The valve and other thingy came with the HWS. I have no idea what the bulgy thing in the pipe is.
      PA210003
      Picture of home made 5 way adapter that screws into the base of the HWS. Hot water from panel on LHS. Water to panel and cold water in on the T pieces.
      I had to bend my tube to make it fit.
      These are a bugger for leaks due to the number of fittings. Use PLENTY of tape.
      ab70_1

      Now for the install.

      I of course had a plumber do all this as doing your own plumbing is illegal. All stories below are his, not mine. That would be naughty.

      For the tank base he put it on large pavers and some sand and concrete mix. The cold inlet and hot outlet I just tapped into the existing pipes and soldered them in. A valve was fitted on both the inlet and outlet to allow me to keep using the existing gas hot water if I needed to and to work on the system.

      The solar loop pipes were put in insulation  then threaded with some twin wire into a length of 50mm PVC pipe. Talcum powder makes this much easier, but it’s still awkward and needs 2 people. This got screwed to the wall and inserted through a 58mm hole in the roof.

      Next he made up the 5 way adapter as per the pics above. I have since found tanks with spare ports at the top and bottom, this may be a better solution. My tank has a curved bottom inside, so he had to bend the pipe to allow it to insert more than 50mm. This does restrict it somewhat. I have no idea how Rheem claims these tanks to be solar convertible, it’s far too difficult. You could do it with T pieces on the inlet and outlet ports, but this risks not mixing the water from the panel with the water in the tank and possibly drawing very varied temperatures into your hot water lines. A bad idea.
      The downside with top and bottom ports is siphoning. At night the warm water will tend to flow upstream to the panels and lose heat. If you have top and bottom ports, you’ll need to install a low pressure non return valve inline. A brass flapper check valve might do the job, but may not close if installed vertically. YMMV. Anecdotally (internet forums) many people report problems with these non return valves.

      I recommend you assemble the frame for the solar panel on the ground to sort out any problems. Mine could be mounted several ways and it’s far easier to make changes before you are on the roof. Also test fit a tube for practice. Once up there the frame from was screwed to the roof battens with roofing screws and some silicon underneath to stop weeping into the holes. The panel didn’t come with plumbing fittings and used a weird size pipe. I couldn’t match it so had to silver solder on some standard 3/4 pipe. This is a very difficult job as there is no length available and it’s very easy to melt the plastic and insulation. Lesson: Make sure your panel pipe is a known size, or comes with fittings.
      Make sure that any compression fittings you use near your panel use Copper olives. I found out several weeks later that Nylon olives melt when they get too hot and won’t cope with a panel. Instant leak and water loss. They are rated for hot water to 85C, not for solar loops with boiling water. They will be fine until the panel is not getting water circulating, at which point the water will boil and the temperature continue to climb. I would hazard a guess that mine got to over 160c when the pump was switched off. Water at 65PSIA (Atmosphere + mains pressure) boils at 147C, a pretty high temperature for plastic to cope with. Your circulating loop may get that hot.
      My second panel came with the correct size copper fittings, but it had no feet, as pictured above, making mountind a bugger.

      Your fittings and pump can now be connected. Plenty of tape = 10+ turns on all the threads will stop most of the leaks. Mine was a bugger for leaks, he hates BSP fittings. The threads are supposed to taper making them seal as they close up, but manufacturing tolerances between vendors insures there are gaps and sometimes teflon tape just isn’t up to the task. Compression fitting with olives should only be done up gently. Once pressure is applied then start to tighten them till they stop leaking. He found this to be far more reliable then tightening them first. If you over-tighten they deform the pipe and won’t seal whatever you do. Fun fun fun.

      You can now fill, bleed and pressurise your system and check for leaks. As the loop to the roof will be full of air, if there is a leak, it may take some time to show up. You can run the pump to push the water up and air out. 

      Once all the water is connected you can insert the vacuum tubes into the panel. The ends need to be coated in thermal paste, so don’t leave them in the sun or you won’t be able to touch them. They are very tight into the rubber seals. A spray bottle of soapy water makes this very easy. The plastic end caps can be a bugger and aren’t particularly well designed on any of the panels I have seen. Luckily the retention is done mostly by the top, the plastic doesn’t do much.

      I ran my pump initially off a simple timer switch until I had time to fit the controller. This works well enough, but does waste some power and isn’t most efficient. On a day with no sun you end up circulating hot water into a cold panel. Luckily the vacuum tube type panel used here wastes almost no heat and may still be warm in this situation.

      The first pump I had was faulty. It would run just fine until the circuit was pressurised, at which stage it would stall. They are designed such that the bearings are supposed to have water on both sides to balance the pressure, this one would push onto it’s bearings and stall. A replacement pump rectified the problem. I would recommend not unscrewing the silver cover cap on the pump unless you have to. The area underneath is pressurised by the circuit and can be problematic to re-seal. The pump will stall with this cap off.

      When I installed the controller I put it into a weatherproof box with the control panel. This became tedious as whenever I wanted to check or change anything I had to unscrew the cover. It’s too difficult for me to core drill my wall to put the display inside, so I put it into a cheap letterbox that is waterproof. The controller is not waterproof. My controller can switch up to 2KW, but the element in the hot water system is 3.6KW. A heavy duty relay resolved the heater issue.

      When you program the controller read the manual, it’s a little complex. What I have found is that the controller will stop the circulating pump once the tank reaches it’s “set” temperature. As this is the same “set” temperature used for the heater, I wanted it quite low. This stopped the pump one day, boiling the panels and melting the nylon fittings. Now it’s set to the max of 75C. I think it’s a bit silly that they don’t let the tank get over 75C from solar, but I have checked different brands and they all seem the same. The pump runs when the temperature difference between the panel and the tank is a set amount. This works fine as well as the sensors get a reliable pickup. The short sensors I have a dodgy at best and don?t read the tank temperature well to all. This can cause the pump to run into the evening and some heat to be wasted. Make sure your pickups actually go into the water of the tank, not just the surface of the steel inside. 

      I have set my tank thermostat (the one built into the Rheem) to minimum. This means that if I do need to boost, I use the minimum power required. The controller may keep trying to keep heating, but the tank will turn itself off at the temperature i have set. Technically this should be over 60c for health reasons.

      The controller can also set when you want to boost. I set it for the end of the day. My logic is that if by 4PM the tank is not up to temperature, then it should boost for 2 hours to get it warm enough, or until the thermostat on the tank cuts out. The controller thermostat is set to 75c for the reasons discussed above with the pump. That’s why I use the tank thermostat for cutout.

      I normally keep the boosting disabled as there is a function on the controller to lock it out. I have only needed to boost three times so far when the panel was too small, or when the controller has played up.

      Costs  
      Tank $125
      Panel 1 $500
      Replacement Tubes $150
      Panel 2 $550
      Pump $125
      Replacement Pump Shipping $15
      Controller $150
      Replacement Cont Shipping $15
      Relay $32
      Plumbing $500
      Pad for Tank $50
      Wiring $75
      Box for Controller $75
      Total $2362

      Key lessons

      1. Get a big enough tank and enough tubes the first time
      2. Pumps / Sensors / Controllers / Electrics are problematic
      3. Plumbing is expensive. Copper plumbing is very expensive
      4. Don’t trust couriers
      5. Leaks happen
      6. Have an understanding family if you DIY
      7. Understand the gov’t rebates well
      8. Nylon olives will melt and leak
      9. Chinese build quality is not ideal, but is good for the price
      10. Chinese fitting sizes may be non standard

      If I was doing this again I would NOT do a ground mounted tank. If you had a roof mounted tank it would circulate naturally. You could run PEX piping, much cheaper and simpler than copper. The loop wouldn’t be needed, saving $500 of fittings, a pump, a pump controller, sensors and wiring. Natural circulation is a far better idea. The downside is that you need a horizontal tank and these are much harder to come by. There are some Chinese ones coming in now I believe. The other option if you don’t care about aesthetics is to mount a normal tank somewhere on your roof with the panels lower than it.

      I think I could have saved $500 or more and a heap of problems with a roof mounted tank.

      A new gas system would have cost me about $1000 and gas was about $150/qtr. This would have probably dropped to $100/qtr. That means that it will still pay itself off, especially if I don’t have to boost.

      I am currently still using the tempering valve that was fitted to the house. Technically a solar system needs a solar compatible tempering valve fitted to cope with the temperature. A tempering valve normally is onyl designed for water up to 85C. Water at 65PSIA (Absolute – atmosphere + 50PSI mains pressure) boils at 147C, not 100C, meaning that water leaving the system could boil at the taps or cause instant burns. The tank is designed to release water if the temperature exceeds 99C or the pressure gets too high, this is through the safety valve. A solar compatible tempering valve is about $350 vs $125 for a normal one.
      You also have to decide what part of your house you want tempered. I like water up to 70C for my washing up tap, shaving and washing machine. The shower and bath should only be 48C. The maximum you can set on a tempering valve is 50C, meaning if you want the hot water to be hotter, it has to be untempered and may reach boiling. There is no simple answer I have found for this problem.  Here are some details on Hot Water Safety

      My system was installed about Sept ’07, but I’m still debugging a few things.

      Update (31/08/08)
      The solar controller (pump / heater controller) has given me heps of problems so far. I have now removed it and am using a home built one. This has it’s own issues, we’ll see how it goes. Contact me if you need more info.

      Update (30/06/10)
      The homemade controller is going strong. I dont control the booster with the solar controller or a timeclock anymore, but have put it on off-peak power instead. That way it’s only on at night. This combination seems to work well. It means the realy is no longer needed.
      The alternate would be instantaneous gas boosting.

      Useful Links

      http://www.voltscommissar.net/K4/kernkraft.htm

      Smashed Solar Collectors

      PA100046I ordered a vacuum tube based solar hot water collector from a company in Sydney for freight to Brisbane. I used Smartsend to get it here as they specialize in eBay type stuff, and this was an eBay type thing. Allied Pickfords delivered the tinkling box of broken glass apologetically to my door.

      The pictures below tell the story of how well couriers treat products labeled in 10 places “Glass, Fragile, This Way Up”

      Of the 15 tubes, 5 made it intact.

      I have a video of breaking these into the rubbish bin and they are pretty tough. Made from borosilicate glass they take some smashing. Looking at the box the courier has either dropped them on their end or crushed the end, as the tubes busted through the polystyrene and the cardboard. Lesson learnt, don’t trust these to a courier. A number of phone calls to other suppliers in Brisbane confirmed a high loss rate with couriers, and most will no longer use them.

      PA100044

      PA100045

      PA100046

      Luckily for me I found (too late) a Gold Coast supplier who could supply replacement tubes, and who was $150 for spares vs the commonly quoted $500 for 10 tubes. Thank you very much Rod from SolarOz.

      I’ll post pics of the system when it is fully installed and operational.

      Dumb SmartUPS inefficiency

      PA060037PA060033

      I used to love the APC Smart UPS range. Fully line interactive, they’ll work of nearly any input power and give perfect output power. They don’t cut to batteries unless there is basically no input whatsoever, so brownouts or out of frequency gensets don’t bother them in the least, or even flatten the batteries. Just what you need living on a minesite, or somewhere the power is often dodgy. I still like them for server rooms, very flexible solution, but not for home.

      I recently bought a power meter and the results were not good…..

       PA060032
      264W – UPS running 2 PC’s, a laptop and a few other bits.

      PA060031 
      126W – Same equipment, same conditions, no SmartUPS

      PA060035
      126W – Same equipment, same conditions, Offline Powerware UPS

      The UPS was fully charged, all equipment was at idle and 30+ minutes after a clean boot. The APC was less than 50% efficient.

      It’s gone now. I’m trying to be somewhat green and using DOUBLE the power to run my computers is not a good tradeoff. I’m sure APC could have done better if they had tried.

      The digital power meters are available from Jaycar

      Bicycle Energy Efficiency vs Car

      I’ve wondered about this for years. I know bicycles are fairly efficient, but I wasn’t sure how efficient the human engine was. This takes all that into account.

      It’s never a fair comparison, as much has to do with trip distance, speed, convenience etc. but it’s a fairly thorough review.

      http://www.lafn.org/~dave/trans/bicycle/bicycle-energy.html

      Summary below.

      Using a bicycle, one can travel about 25 times as far on a Calorie of food than on a Calorie of gasoline (by automobile). Unfortunately, it took perhaps 15 Calories of fuel to create that Calorie of food, so the bicycle is only about 5/3 as energy-efficient per person-mile of travel if one doesn’t count the energy cost of the extra time it takes to travel by bicycle.

      It takes about 15 times more mechanical energy to transport one by auto as compared to a bicycle. Even though automobile engines are at best about 50% more efficient than a human bicyclist pedalling, the bicyclist is typically about 2/3 more efficient than the auto engine in converting food/fuel into useful work, due to the failure of autos to fully utilize their higher efficiency. So considering only the mechanical and engine efficiencies (including the human “engine”) the bicycle is about 25 times more energy-efficient. But the high fossil fuel energy cost of making food reduces the 25-times advantage to less than 2-times. Counting the energy cost of the additional time it takes to get somewhere by bicycle may result in the overall energy-efficiency of the bicycle being worse than the auto

      A bicycle does save energy in many cases, since it limits the distance people can travel and some (or all) of the energy used for bicycling might be used anyway for the exercise needed for health. To make it many times more more energy efficient (before counting the energy cost of time) requires greatly reducing the energy required to create and transport food. See Better Energy-Efficiency in Food Production

      Remix and Return – Nuclear Waste is no big worry

      Nuclear waste is EASY to deal with, just put it back in the hole you dug it out of!

      I’m not your normal tree hugging greenie. I think that humans are here to stay and we need to figure smart ways of living within the environment. The means we use things from it, and eat the things around us, even the cute furry things. BUT, we need to do this sustainability, so our kids can eat the cute furry things too.

      Coal fired power stations are not what I would call a sustainable proposition. Dumping untold millions of tons of invisible CO2 into the atmosphere is not likely to be a good thing to do. General consensus seems to agree.

      Nuclear Power on the other hand seems much smarter to me. Sure the leftovers are pretty nasty, but there is very little material to deal with. Now, think about this for a minute. They dug up the dirt with the Uranium in it, concentrated the Uranium until it would react, and shoved it in a reactor. It got used, when it went in it was highly radioactive. When it is used it is less radioactive – that’s why they are pulling it out and calling it used. So if you now mix this less radioactive mix back in with the original dirt you have – amazingly – a less radioactive pile of dirt then when you started. Now, put it back in the hole that it came from. Presto – disposed. It can’t be used for weapons, isn’t economic to dig up, and is exactly like the place was before you started mining.

      “Not in my backyard” – well what if that’s where it came from in the first place?

      They call it Remix and Return. I can’t say I was the first to invent it, but it seems pretty obvious to me.

      Bring on that clean nuclear power. (oh – and Solar too).

      Review – Crompton CF Downlights


       The website is here

      These things are excellent. 15W each. AU$40 for a pack of 4 from Lighting Illusions.

      They are a reflective compact fluorescent downlight. The glass cover keeps the bugs out from between the tube elements as a bonus.

      Startup is electronic and nearly instant. Warm up time is minimal, about the same as your eyes.  

      The bulbs are 5000K colour – Daylight. It is a very white light, makes the 50W halogen downlights look dull yellow in comparison. They look far whiter than the 3800K Warm White reflective downlight I tried.

      They don’t shed as much light per watt as a straight or round tube, but not much does. For a downlight they are far far more efficient than a Halogen.

      If you want to go green, with a modern unobtrusive look, these are a great product.

      Highly Recommended – 5/5