As my 1HZ has an aftermarket turbo, and as I occasionally give it a good workout towing large loads, I decided it highly appropriate to fit an EGT gauge. This would allow me to see just how hard I was working the motor and reduce the risk of catastrophic damage from pushing things to hard. It is very possible to have extreme EGT’s with the resultant cracked pistons, head damage, cracked valves and yet have the engine temp read normal. Fitting the boost gauge and EGT would also open up further tuning potential.
I decided on Autometer as they are know to be very high quality and if bought from the US, well priced. VDO is another well respected brand, but is getting hard to source.
I ended up buying from AtlanticSpeed as the EGT gauge (the most expensive) was US$148 vs $351 in Australia. eGauges also has a good reputation, but couldn’t supply the metric gauges I wanted at the time. Thermoguard is an Australian company that does a very good digital EGT gauge for AU$265, however I didn’t have a suitable place to mount this type and preferred the analogue style of readout.
I settled on a Diesel EGT Gauge – 3344-M as the most appropriate. It is metric, 270 deg sweep for good resolution (90 deg sweep makes it hard to pick small changes) and has a suitable range for a diesel engine, 0 – 900 C. There are many EGT gauges designed for petrol engines that go to 1200 C, however in a diesel this “wasted” and again reduces resolution. I wanted to be able to pick small changes.
There are no Autometer boost gauges that go from 0 – 15 PSI. There are plenty that do vacuum as well, however diesels generally do not generate vacuum. There were plenty that went to 30PSI, however as I am only running low – medium boost, this would again have reduced resolution. I ended up using a Fuel Pressure Gauge – 3311 for US$40.
Postage for these plus another set for a mate was US$44, keeping the cost well below what I could get similar from within Australia.
The 2 gauge pod came from eBay to suit 2 1/16″ (52.4mm) gauges.
Fitting is as below
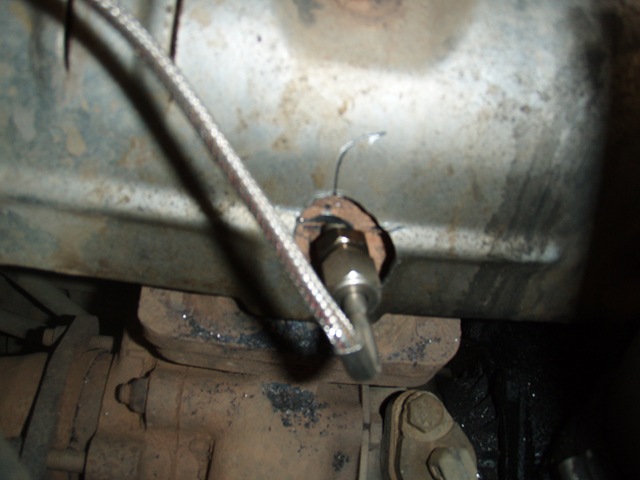
| EGT thermocouple drilled and tapped into the side of the exhaust manifold before the turbo. This is the best position to detect EGT. Hole is imperial drill size 0.332 with a 1/8″ NPT tap run through it. Any fine shavings won’t bother an exhaust turbine wheel at all as it is designed to deal with flakes of carbon. The manifold drills and taps easily. The heat shield bolts were seized so I gave up and drilled a hole in it. When tapping – use some lubricant with the tap. Be firm and keep it very square, it’s not that thick so cross threading is easy and would be bad. Use a proper tap handle and not a shifter, you won’t keep a shifter square. |  |
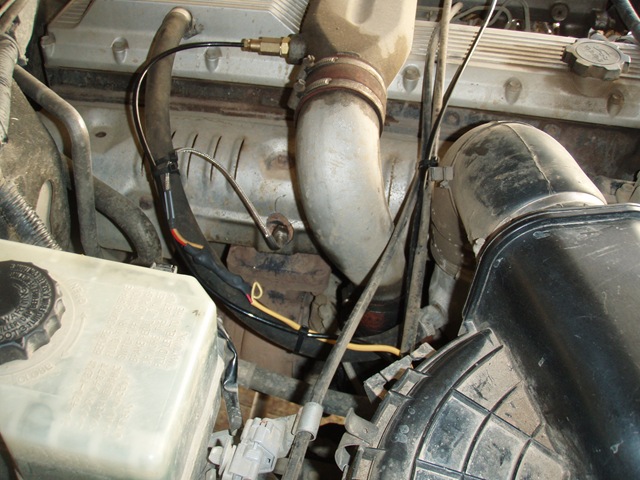
| A trip to a fittings and hose shop made up an adapter for the factory port in the crossover pipe and supplied the hose / adapters needed for the boost gauge. There are no ports in the manifold itself. |  |
| The wire and hose was run to allow for movement and flex |  |
| Spare length for the thermocouple should not be trimmed to maintain factory calibration. Spare length for the boost gauge helps to damp any vibration and pulsing giving a smoother reading. |
 |
| I had to silver solder up an adapter for the fuel pressure gauge. It uses a flare fitting and I wanted to connect to nylon hose. Further, the pod had very tight constraints for size, so getting the length and angle just right was just right. This is probably the most difficult part. |  |
| Test fitting the two gauges in the pod. The black plastic pod received three coats of Grey Vinyl Paint to match the car interior. This paint won’t damage the plastic. |  |
| Mounted on the A pillar there is very little obstruction to vision. The distance is good enough to be clearly visible. I placed the EGT gauge further away as this makes it easier to see. The human eye can change direction quickly but is very slow to change focus. The further away your gauges are the easier it is to glance at them. |  |
So far the 1HZ Cruiser is running 9.5PSI Boost and the following EGT’s
| 100KM/Hr Cruise | 350 C |
| Town Acceleration | 500 C |
| Highway Acceleration | 500 C |
| Highway Hill | 450 C |
| Highway Overtaking (WOT) | 600 – 650 C |
| Large Long Climbs (WOT) | 720 C |
The fuel gauge does seem a little notchy in it’s role as a boost gauge, but works well enough and is quite precise. The EGT gauge is sensitive to electrical noise and low voltage. Make sure it gets a good feed or the needle will jump around.
excellent article, cheap insurance, upgrade would be an alarm that trips when too hot – cant rely on the driver to always watch the temperature.
Hi Paul,
Great article. I am just about to purchase the gauges and give it a go. Not sure if you still respond to questions. Would appreciate knowing how it is going after a few years, everything still work fine. What boost have/ did you run up to?
With the fuel pressure gauge did you go to the house shop for the pipe and fittings both ends? What hose shop, was it like Reece plumbing?
Cheers,
John